In a React application, the basic structure item is a component. Developers use them to split the code and isolate parts of the application.
Lifecycle methods in react :
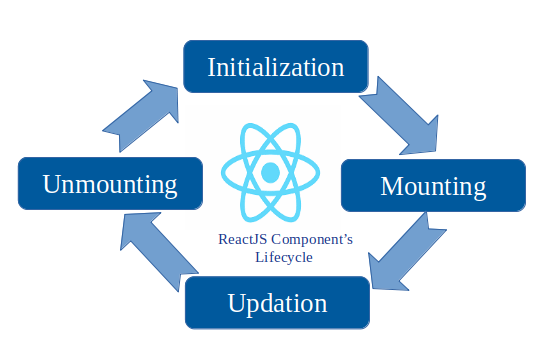
A React Component can go through four stages of its life as follows.
- Initialization: This is the stage where the component is constructed with the given Props and default state. This is done in the constructor of a Component Class.
- Mounting: Mounting is the stage of rendering the JSX returned by the render method itself.
- Updating: Updating is the stage when the state of a component is updated and the application is repainted.
- Unmounting: As the name suggests Unmounting is the final step of the component lifecycle where the component is removed from the page.
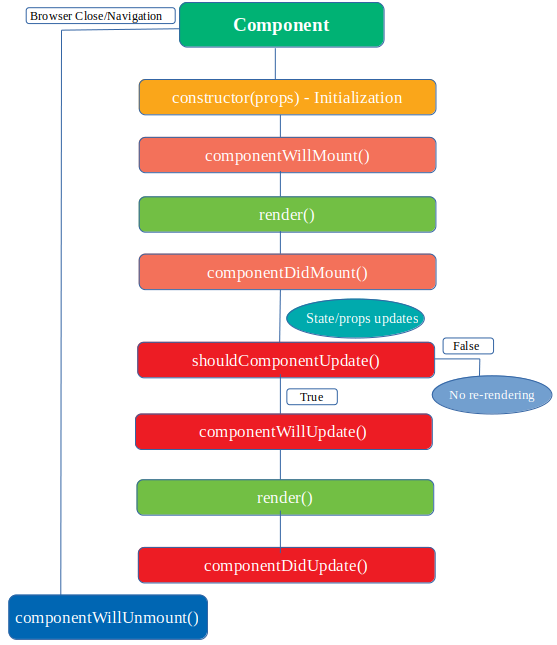
Here is a flowchart representation of lifecycle methods :
We can divide components into two main groups:
1. Class Components – can manage the component lifecycle and state management by default.
2. Functional Components – simple, quick to create, and stateless by default. (Using Hooks)
Each React class component has a lifecycle, which essentially is a component’s state. The lifecycle logic was defined and provided by React (class component inherits from React.Component) and adds support ability to handle events in each component lifecycle stage. There are different phases to the lifecycle – or in other words – three stages of a component’s life: mounting, updating, and unmounting. Flow is simple and a little bit similar to the natural life cycle.
React components have lifecycle methods, which are methods that are called at specific points in the life of a component. Understanding these methods is important for controlling the behaviour of a component.
During what stages of a React Component Life Cycle, do we call Life Cycle Methods?
When it is created, mounted, updated, and unmounted.
There are three different phases of React component life cycle :
1. Mounting – birth of the component.
2. Update – growth of the component.
3. Unmount – death of the component.
Now, what is a component’s lifecycle? As you can see above – it’s simply a life of a component. First, it gets mounted on the DOM (the birth stage). Secondly, it gets updated over time, which essentially means its growth. And finally, last but not least, it gets unmounted, which is the end of the component.
Class Components (not recommended to be used with React 17+)
Each class component in each lifecycle stage has built-in methods available which give developers a way to react when the component evolves. The component evolves when props or state change. The situation is a little bit different when using hooks in functional components, but it will be described later.
Why is it important ⁉️ to understand the React Lifecycle methods even though React hooks have simplified many aspects of managing state and lifecycle in React Components?
⏹️ When working with Legacy React codebases that are still using React Lifecycle methods which have not yet migrated to React hooks
⏹️ Helps in Debugging Code (bugs or performance issues)
⏹️ When customizations are required based on the component lifecycle
⏹️ Not all third-party libraries and packages are compatible with React hooks & sometimes developers need to rely on lifecycle methods to integrate these libraries
⏹️ With Lifecycle methods, you have more Granular control over what happens at each stage of the component’s lifecycle
⏹️ Lifecycle methods provide a lot of Flexibility in how you structure and manage your components
Stage 1. Mounting
This phase occurs when the component is being created and inserted into the DOM. It involves the following methods:
- constructor()
- componentWillMount() // discontinued
- getDerivedStateFromProps()
- render()
- componentDidMount()
The render() method is required and will always be called, the others are optional and will be called if you define them.
1. constructor
The first method is the constructor method which is called before the component is mounted. You can implement this method at the top of the component structure. Constructor might be used for initialising local component state and binding event handler methods. Now, onto the other lifecycle methods.
The constructor() method is called before anything else, when the component is initiated, and it is the natural place to set up the initial state and other initial values.
The constructor() method is called with the props, as arguments, and you should always start by calling the super(props) before anything else, this will initiate the parent’s constructor method and allows the component to inherit methods from its parent (React.Component).
The constructor method is called, by React, every time you make a component:
class Header extends React.Component {
  constructor(props) {
    super(props);
    this.state = {favoritecolor: “red”};
  }
  render() {
    return (
      <h1>My Favorite Color is {this.state.favoritecolor}</h1>
    );
  }
}

ReactDOM.render(<Header />, document.getElementById(‘root’));
2. componentWillMount() // discontinued
Invoked just before the render method. Usually used to set the component state to avoid additional re-renders. Might not contain any side-effects handlers. From React version 17 it became legacy and will be discontinued in the future. This method has been replaced by the getDerivedStateFromProps method.
3. getDerivedStateFromProps
The getDerivedStateFromProps() method is called right before rendering the element(s) in the DOM.
This is the natural place to set the state object based on the initial props.
It takes state as an argument, and returns an object with changes to the state.
The example below starts with the favourite color being “red”, but the getDerivedStateFromProps() method updates the favourite color based on the favcol attribute
The getDerivedStateFromProps method is called right before the render method:
class Header extends React.component {
    constructor(props) {
        super(props)
        this.state = {favouriteColor: "red"};
    }

// getDerivedStateFromProps()
    static getDerivedStateFromProps (props, state) {
        return { favouriteColor: props.favcol}; // changing the state here
    }

    render() {
        return (
             <h1>My Favorite Color is {this.state.favoritecolor}</h1>
        );
    }
}

// passing favcol as props
ReactDOM.render(<Header favcol="yellow"/>, document.getElementById('root'));
4. render()
Contains JSX code which should be rendered when the component is mounted. Unlike the other methods described above, render() is the only required method and does not depend on the user. React calls this method automatically when some prop or state value changes. This is a result of a default React component principle that says: always re-render.
The render() method is required, and is the method that actually outputs the HTML to the DOM.
A simple component with a simple render() method:
class Header extends React.Component {
    render() {
        return (
            <h1> This is the content of the Header component </h1>
        )
    }
}
ReactDOM.render(<Header />, document.getElementById('root'));
5. componentDidMount()
This method is invoked after the first render component in the DOM. This is a good place to operate on the DOM tree or set up any subscriptions. It might also be used to set a state. It will trigger extra rendering but the screen will not be refreshed by the browser just yet. As a result, intermediate state values invoked in the render method will not render in the browser.
The componentDidMount() method is called after the component is rendered.
componentDidMount method is called once after the component is mounted and inserted into the DOM. It is used for initialization tasks like setting up event listeners or fetching data from an API.
This is where you run statements that requires that the component is already placed in the DOM.
Eg.
// At first my favorite color is red, but give me a second, and it is yellow instead:

class Header extends React.Component {
  constructor(props) {
    super(props);
    this.state = {favoritecolor: "red"};
  }
  componentDidMount() { // componentDidMount
    setTimeout(() => {
      this.setState({favoritecolor: "yellow"})
    }, 1000)
  }
  render() {
    return (
      <h1>My Favorite Color is {this.state.favoritecolor}</h1>
    );
  }
}

ReactDOM.render(<Header />, document.getElementById('root'));
Stage 2. Updating
The next phase in the lifecycle is when a component is updated.
This phase occurs when the component is updated due to changes in props or state.
It involves the following methods:
- getDerivedStateFromProps()
- shouldComponentUpdate()
- render()
- getSnapshotBeforeUpdate()
- componentDidUpdate()
1. getDerivedStateFromProps() – before the update happens
Also at updates the getDerivedStateFromProps method is called. This is the first method that is called when a component gets updated.
This is the natural place to set the state object based on the initial props.
It takes state as an argument, and returns an object with changes to the state.
Eg.
Even though you click the button, it will not turn to blue, it will show yellow because of getDerivedStateFromProps()
    import React from 'react;
  import ReactDOM from 'react-dom/client';

    class Header extends React.Component {
        constructor (props) {
            super(props);
            this.state = { "favoritecolor" : "red" };
        }
        static getDerivedStateFromProps(props, state) { // overriding changeColor()
            return { "favoritecolor": "yellow" };
        }
        changeColor () {
             this.setState({favoritecolor: "blue"});
        }
        render () {
            return (
                <div>
                    <h1> My Favorite color is ${this.state.favoriteColor} </h1>
                         <button type="button" onClick={this.changeColor}>Change color</button>
                </div>
            )
        }
    }

const root = ReactDOM.createRoot(document.getElementById('root'));
root.render(<Header favcol="yellow" />);

/*
This example has a button that changes the favorite color to blue,
but since the getDerivedStateFromProps() method is called,
the favorite color is still rendered as yellow
(because the method updates the state
with the color from the favcol attribute).
*/
2. shouldComponentUpdate() – to tells whether a component should rerender or not (bool)
This method is used to avoid unnecessary component re-renders. By default, the component will re-render on every prop or state change. The developer may determine the condition when the component should be re-rendered. This method is invoked when new props or states are being received. There are some exceptions to the rule, for example, when it is the first component rendered or when forceUpdate() is used.
In the shouldComponentUpdate() method you can return a Boolean value that specifies whether React should continue with the rendering or not.
The default value is true. // always re-renders
The example below shows what happens when the shouldComponentUpdate() method returns false:
eg.Stop the component from rendering at any update:
import React from 'react';
import ReactDOM from 'react-dom/client';

class Header extends React.Component {
    constructor(props) {
        super(props)
        this.state = {favoriteColor: "red" };
    }

    shouldComponentUpdate()  { // won't rerender when false
         return false;
    }

  changeColor () {
         this.setState({favoritecolor: "blue"});
    }

    render() {
        return (
            <div>
                <h1> My Favorite color is ${this.state.favoriteColor} </h1>
                <button type="button" onClick={this.changeColor}>Change color</button>
            </div>
        )
    }

}

const root = ReactDOM.createRoot(document.getElementById('root'));
root.render(<Header favcol="yellow" />);
Let’s change that to true :
import React from 'react';
import ReactDOM from 'react-dom/client';

class Header extends React.Component {
  constructor(props) {
    super(props);
    this.state = {favoritecolor: "red"};
  }
  shouldComponentUpdate() { // rerendering enabled
    return true;
  }
  changeColor = () => {
    this.setState({favoritecolor: "blue"});
  }
  render() {
    return (
      <div>
      <h1>My Favorite Color is {this.state.favoritecolor}</h1>
      <button type="button" onClick={this.changeColor}>Change color</button>
      </div>
    );
  }
}

const root = ReactDOM.createRoot(document.getElementById('root'));
root.render(<Header />);
3. Render()
The render() method is of course called when a component gets updated, it has to re-render the HTML to the DOM, with the new changes.
Contains JSX code which should be rendered when the component is mounted. Unlike the other methods described above, render() is the only required method and does not depend on the user. React calls this method automatically when some prop or state value changes. This is a result of a default React component principle that says: always re-render.
The render() method is required, and is the method that actually outputs the HTML to the DOM.
4. getSnapshotBeforeUpdate() – runs before rerendering
The method is called right before the component re-renders by using the render method. Commonly used to get some data needed after the next render,
getSnapshotBeforeUpdate(prevProps, prevState)
In the getSnapshotBeforeUpdate() method you have access to the props and state before the update, meaning that even after the update, you can check what the values were before the update.
If the getSnapshotBeforeUpdate() method is present, you should also include the componentDidUpdate() method, otherwise you will get an error.
The example below might seem complicated, but all it does is this:
When the component is mounting it is rendered with the favorite color “red”.
When the component has been mounted, a timer changes the state, and after one second, the favorite color becomes “yellow”.
This action triggers the update phase, and since this component has a getSnapshotBeforeUpdate() method, this method is executed, and writes a message to the empty DIV1 element.
Then the componentDidUpdate() method is executed and writes a message in the empty DIV2 element:
Use the getSnapshotBeforeUpdate() method to find out what the state object looked like before the update:
import React from 'react';
import ReactDOM from 'react-dom/client';

class Header extends React.Component {
    constructor(props) {
    super(props);
    this.state = {favoritecolor: "red"};
  }
    componentDidMount() {
    setTimeout(() => {
      this.setState({favoritecolor: "yellow"})
    }, 1000)
  }
    getSnapshotBeforeUpdate(prevProps, prevState) { // has the value of prevState
    document.getElementById("div1").innerHTML =
    "Before the update, the favorite was " + prevState.favoritecolor; // red
  }
     componentDidUpdate() {
    document.getElementById("div2").innerHTML =
    "The updated favorite is " + this.state.favoritecolor; // yellow
  }
    render() {
    return (
      <div>
        <h1>My Favorite Color is {this.state.favoritecolor}</h1>
        <div id="div1"></div>
        <div id="div2"></div>
      </div>
    );
  }
}

ReactDOM.render(<Header />, document.getElementById('root'));
5. componentDidUpdate()
componentDidUpdate method is called every time the component is updated due to changes in props or state. It is used for tasks like updating the DOM or making API calls based on the updated props or state.
- Method componentDidUpdate is called right after render(), excluding the initial render call. Used to operate on a DOM tree or to handle certain side-effects when any of passed arguments change.
The componentDidUpdate method is called after the component is updated in the DOM.
     componentDidUpdate() { // called everytime whenever state favouritecolor changes
    document.getElementById("div2").innerHTML =
    "The updated favorite is " + this.state.favoritecolor; // yellow
  }
Stage 3. Unmounting
Unmounting is the last stage of a component’s life.
The next phase in the lifecycle is when a component is removed from the DOM, or unmounting as React likes to call it.
React has only one built-in method that gets called when a component is unmounted:
- componentWillUnmount()
componentWillUnmount() – when a component is unmounted
This method is invoked immediately before component destruction. Used to clean up, remove listeners, subscriptions, abort pending requests, etc.
class Container extends React.Component {
    constructor(props) {
        super(props);
        this.state = {show: true}
    }
    delHeader () {
        this.setState({show: false});
    }
    render() {
        let myHeader;
        if (this.state.show) {
            myHeader = <MyHeader />;
        }
        return(
            <div>
                {myHeader}

                <button type="button" onClick={this.delHeader}> Delete Header </button>
            </div>
        )
    }
}

class MyHeader extends React.Component {
    componentWillUnmount() { // throws an alert before the header component hides
        alert("The component named MyHeader is going to unmount ");
    }
     render () {
            return (
                <h1> Hello World </h1>
            )
        }

}


ReactDOM.render(<Container />, document.getElementById('root'));